Okay, so I did say I was going to wait until I cleaned my sewing room before any more sewing, but I really needed a new pair of jeans. I have been really unsatisfied with off the rack jeans for a long time and wanted a pair that was perfect for me.
About 10 or 15 years ago, RTW jeans were no longer really jeans. As you are probably aware, denim was combined with other fibres to make it stretchy. At the same time, waists dropped and we had 'low rise' and 'extremely low rise' jeans. Basically, any bulges don't look good in them and you almost fall out of them whenever you move. These type of jeans only look good on skinny, prepubescent bodies.
 |
| The sun is low and the leaves are yellow - fall is here! |
I found some real denim fabric for cheap ($7 at a second hand store) and really wanted to make jeans. I was so impatient, I didn't even wait to find a pattern - I made my own! And I'll show you how I did it...
I had a pants pattern (Burdastyle 8/2013 #118), so I turned it into a jeans pattern with a few alterations. Jeans are like other pants, but with a few differences:
- No pleats
- Flat-felled seams
- "Complicated" fly front
- Back pockets
- More topstitching
- Belt loops
- Tack Button

I used swedish tracing paper to trace the pants pattern. The pants are really wide, so I folded in the legs a bit; keeping enough to let me take more in later if I felt I needed to.

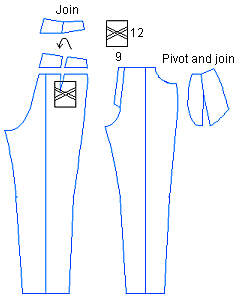
Removing Pleats
To remove back pleats from a pattern, you create a back yoke. I folded my pants pattern down in a line that starts 7cm (2 3/4") plus seam allowance down the back centre seam and 4 cm (1 1/2") plus seam allowance down the side seam. You can just cut your pattern, but I'm saving mine for later.

Retrace the top of the back pants piece. Remove the dart by pivoting the piece and matching up the dart lines. You should end up with a curved piece like this:

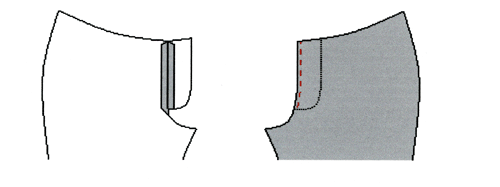
I am lucky in that the front pants pattern did not have pleats. Instead, like with jeans, the shaping is done through the shaping of the front pocket. Basically, the front pocket piece is pivoted to close the dart on the top and add fullness to the bottom of the pocket. To see how to remove a front pleat and for more pictures, see this guide at Leena's.
 |
| (Leena's.com) |
All I had to do was reshape the pocket with the traditional curve.

I also made the pocket into a few different pieces. I did not want to make it all in denim; just the part that shows.
 |
| inside of the jeans |
Flat-Felled Seams
Jeans are put together using flat-felled seams. When doing the back pieces, attach the yoke pieces first with flat-felled seams. Then attach the back pieces together along the center with flat-felled seams.
 |
| Back |
Flat-felled seams are also used for the in-seam.
"Complicated" Fly
The pattern I am using and most jeans (from what I can tell in my husband's and my wardrobes) use what is called a complicated fly. It's more complicated than the simple fly, because the facings are separate pieces that are sewn on, rather than part of pants front piece.
 |
| (Fashion Freaks) |
I think it is used for jeans because it helps the fly flap keep its shape through the extra fabric in the seams.
For a step-by-step guide with pictures, see this Fashion Freaks post.
Back Pockets and Topstitching
Jeans just aren't jeans without the classic trapezoidal back pockets. Trace some from an old pair of jeans if you are unsure of the shape. Have fun with the topstitching on them. I made a simple loop.

Topstitching is also used along the front pocket openings and on the side seam. Press the side seams towards back and topstitch close to the seam from the waist to about an 3 cm (1") below the bottom of the back pockets.

If you are nervous about your topstitching skills, do what I did: choose a dark fabric and dark thread. It's hard for other people to see that your stitches are not the straightest.
If you are not sure where else to topstitch, keep an old pair of jeans handy as a reference.
Belt Loops
All that is left that separates the pattern I started with and my new jeans pattern are some belt loops. Looking at a few RTW jeans, it looks like they use a twin needle to make the loops. This makes two lines of stitching on the front of the loop and zig-zags closed the back.
I didn't have a denim twin needle, so I just pressed them into the right shape and stitched along each side with a single line of stitching. Only time will tell if my raw edges on the back side of the loops become a problem. So far, they are holding up fine.
Tack Button
Jeans use a tack button instead of a sew on button. I was smart and saved and extra one from a pair of jeans I bought a few years ago, so I didn't have to run to the store to buy one. Here is an good video on installing tack buttons.
Put it All Together and .... Tada!
I ended up with a pair of pants that really look like RTW jeans.

Pros and Cons of with Denim
I love sewing with and wearing denim!
Pros:
- It irons very easily - it keeps it's shape, so you can sometimes skip pins if you iron first
- It's durable - these pants will last a long time
- You can make jeans with zero or negative ease - they will fit like a glove and hold you together (bulges are kept in place, unlike with stretch denim)
- It's easy to undo mistakes - denim is forgiving if you have to redo a seam
- It's comfortable - I love the feel of denim when I'm wearing it
- It is thick, so it can be hard to sew through

Above, I am using a piece of denim to hold up the back of my foot at the beginning of a seam. The goal is to have your presser foot level, so it provides proper tension.
My New Jeans!

I'm very happy with my new pair of jeans.
I had to do some fitting alterations. I took in the side seams quite a bit. My Burda shorts fit perfectly at size 40 (a size smaller than what it says for my measurements), but what I found out with this pattern (same size), was that these Burda pants were meant to slide down with wear. They were designed with extra ease in the waist... and I didn't read that part in the description until after I started. I took in the side seam about 1/4" on each side at the waist and hips. But, as I mentioned above, since denim can be worn with zero or even negative ease, I should have probably gone down another size.
There was also some extra fabric in the front crotch - I removed that by making the front crotch seam allowance bigger compared to the back seam. Because of this alteration, I had to level out the waistband, since it cause the front of the pants to dip down a bit.

Hope you like my jeans!

2 comments
Nice! I love all of the little details! It all looks so professional, and the topstitching is so neat. I love that you could topstitch your pockets any way that you would like! Although I love the idea of homemade jeans with zero ease denim, I actually need the ease A LOT. All of my weight is in my middle, so any time I sit down, I need pants with ease or else I have serious muffin top! I don't know if that would be remedied with custom pants, but until then I'll rely on storebought and wear lots of dresses!
ReplyDeleteThanks Diane! And as to the ease, real denim relaxes with wear. So, although I made my pants with hardly any ease, they loosen up after about 20 minutes of wear and it's like I have too much ease. So, even if you are buying jeans, it's good to keep in mind that, if a pair of jeans fits perfectly when you first put them on, they might end up feeling too big with regular wear.
Delete